The key features of JIRA
Jira possesses many capabilities, and if it’s missing a feature you need, add it by visiting the Atlassian Marketplace, an online store where you can find third-party software to supplement Jira’s core capabilities.
One project management example is the Trello-Jira integration. This feature allows teams to execute projects with their preferred tool, and data automatically syncs between the platforms.
Jira’s abilities are so vast, it’s impossible to cover them all, but here are a few of Jira’s key features.
1. Workflows
Jira’s project management capabilities rely on workflows. These Jira workflows represent processes in your organization, and control the rules used to transition project tasks to different workflow stages.
For instance, tasks might begin in a pending stage. A task moves to an in-progress state when a team member works on it until the task reaches a completion stage, when the work is done.
Jira allows you to customize workflows to meet your organization’s needs. If a completed task needs to enter a review stage, you can add that step. Jira comes with default workflows to get you started, or download pre-built workflows from the Atlassian Marketplace.
2. Reports
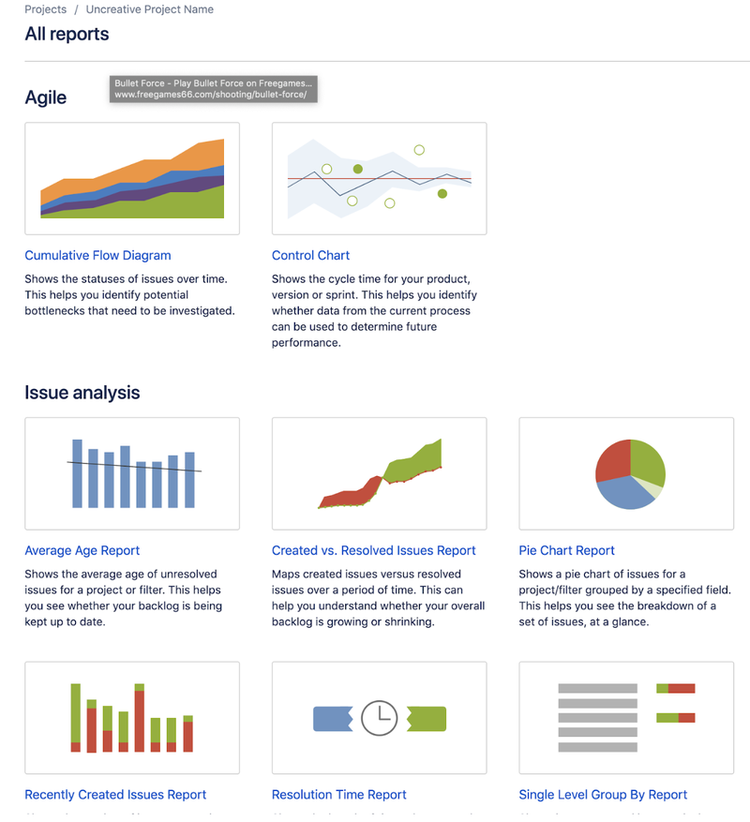
All projects require reports to track progress and deliver actionable insights such as when your project is at risk of scope creep. Several out-of-the box Jira reports deliver these insights.
You can identify team members assigned too much work, discover project bottlenecks, and learn how long it’s taking to complete project tasks. And if Jira’s options aren’t enough, you can design your own reports.
'%3E%3CanimateTransform attributeName='transform' type='rotate' repeatCount='indefinite' dur='2s' values='0 375 411;360 375 411' keyTimes='0;1'/%3E%3C/circle%3E%3C/svg%3E)
Jira includes several reporting options to deliver project visibility. Image source: Author
3. Automation
Use Jira’s automation engine to automatically address repetitive tasks and processes, saving you and the project team time and effort. You define the rules that trigger automation actions, such as emailing the project manager when a task reaches completion.
Jira comes with built-in automation rule templates so you don’t have to start from scratch. The automation also works with third-party software you integrate from the Atlassian Marketplace, so these systems remain in sync with Jira.
How to use Jira for project management
Jira delivers a comprehensive suite of project management tools. Features are available for every project stage, from project creation to execution and completion. These five steps summarize Jira’s key capabilities along the project life cycle.
Step 1: Project configuration
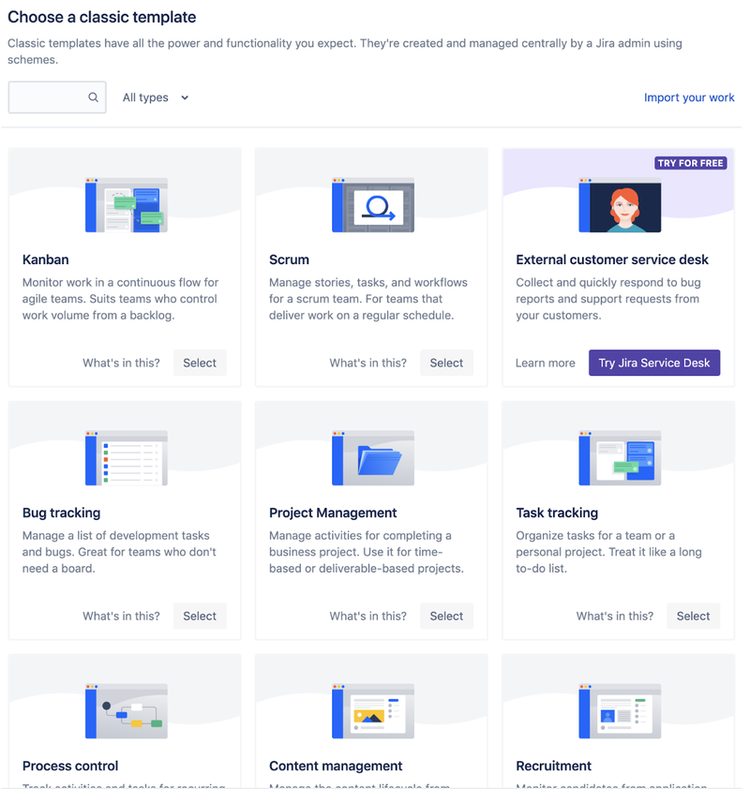
Choose a Jira template to set up your project. Templates are a quick way to configure your project based on the processes used at your organization.
For instance, if your team employs kanban project management, pick the kanban template, and Jira will set up a default kanban board and workflows. You can then customize the default settings to match your team's needs.
'%3E%3CanimateTransform attributeName='transform' type='rotate' repeatCount='indefinite' dur='2s' values='0 375 394;360 375 394' keyTimes='0;1'/%3E%3C/circle%3E%3C/svg%3E)
Jira’s templates make project setup simple and straightforward. Image source: Author
Step 2: Project plan
Every project requires planning. Jira offers the ability to sketch out a project plan for a time-based project, or a roadmap for ongoing, iterative projects such as software development.
To build your plan in Jira, start by defining project tasks. The heart of every project are its tasks. Use a work breakdown structure to identify the tasks to complete your project before entering them into Jira.
In Jira, tasks are called issues. They appear as digital cards holding the information required to complete the task.
- Describe the task in the card.
- Add documents or images that explain or elaborate task details.
- Mark the most important tasks with a high priority.
- Set due dates.
- Break up larger items into sub-tasks.
- Assign each task to a teammate, or put it in your project backlog to address when the time is right.
Once you’ve created your tasks in Jira, assemble them into your project plan, identifying and mapping dependencies to ensure these tasks don’t become blockers for your team.
Jira provides advanced project planning features that let you assemble multiple projects into one comprehensive plan, or you can keep projects separate.
The software also lets you create different project plan versions. This capability allows you to model out various scenarios to assess situations, such as worst- and best-case scenarios for your project.
Step 3: Team set up
With a plan in hand, it’s time to parse out work to initiate project execution. Before you can do that, every project teammate must be set up in Jira.
Not all project team members need equal Jira access. Some use Jira only to track work and complete tasks, while the Jira administrator configures Jira’s settings, connections to third-party apps, and other functions that require unlimited access.
This is where Jira’s permission schemes come into play. Permission schemes allow you to create a set of default permissions to apply to Jira users, saving time so you don’t have to implement permissions to users individually.
You can set permissions so that some individuals cannot view specific tasks. This feature is useful when employing contractors or other Jira users outside of your company to prevent them from viewing sensitive business information.
When your team is established in Jira, assign them tasks. Jira lets you monitor team capacity so you can assess if a person’s workload is too much or too little.
Step 4: Tracking
Jira offers several tools to track project progress. Time-tracking capabilities enable you to track the time each task takes. If Jira’s default time tracking features don’t meet your needs, go to the Atlassian Marketplace for third-party options.
Jira’s reports provide insights into team progress. Are tasks about to miss deadlines? Is a dependency going to cause a bottleneck? Jira’s reporting tools deliver the answers.
For greater visibility and convenience, customize Jira’s default dashboard to highlight the key information around your project. Add a calendar view, a pie chart breaking down status across all tasks, the work assigned to every team member, or swap out components throughout the project to make the dashboard work best for your needs.
Step 5: Project completion
Once a project reaches its goals and all tasks are completed, it’s time to wrap up the project. Jira offers two approaches. You can use its built-in archive function to close out a project and remove it from active use within the system.
Archiving a project means it’s no longer available to edit or to view except in Jira’s archived projects section.
You can also shut down permissions to a project so it’s read-only, preventing users from adding new tasks to a closed project while still enabling you to search for and view items in the project.
Final words about JIRA for project management
Jira’s rich feature set and ability to extend those capabilities through its marketplace make it a comprehensive project management tool. Jira pricing starts at free for teams up to 10 people. From there, pricing is on a per user basis depending on the desired Jira features.
Yet among the project management frameworks, Jira’s greatest strength lies in its scrum support. If your team uses the scrum approach, Jira is a great option. If not, a Jira alternative may work better.
To learn more about Jira, check out The Ascent’s Jira review.